To celebrate the launch of Frosthaven on Kickstarter, we at AYCB are doing class overviews of the six starting classes. Before writing these, we are playtesting the classes in the Frosthaven Demo on Tabletop Simulator. We will focus on the level 1 cards for each class.
Our third overview is for the Deathwalker.
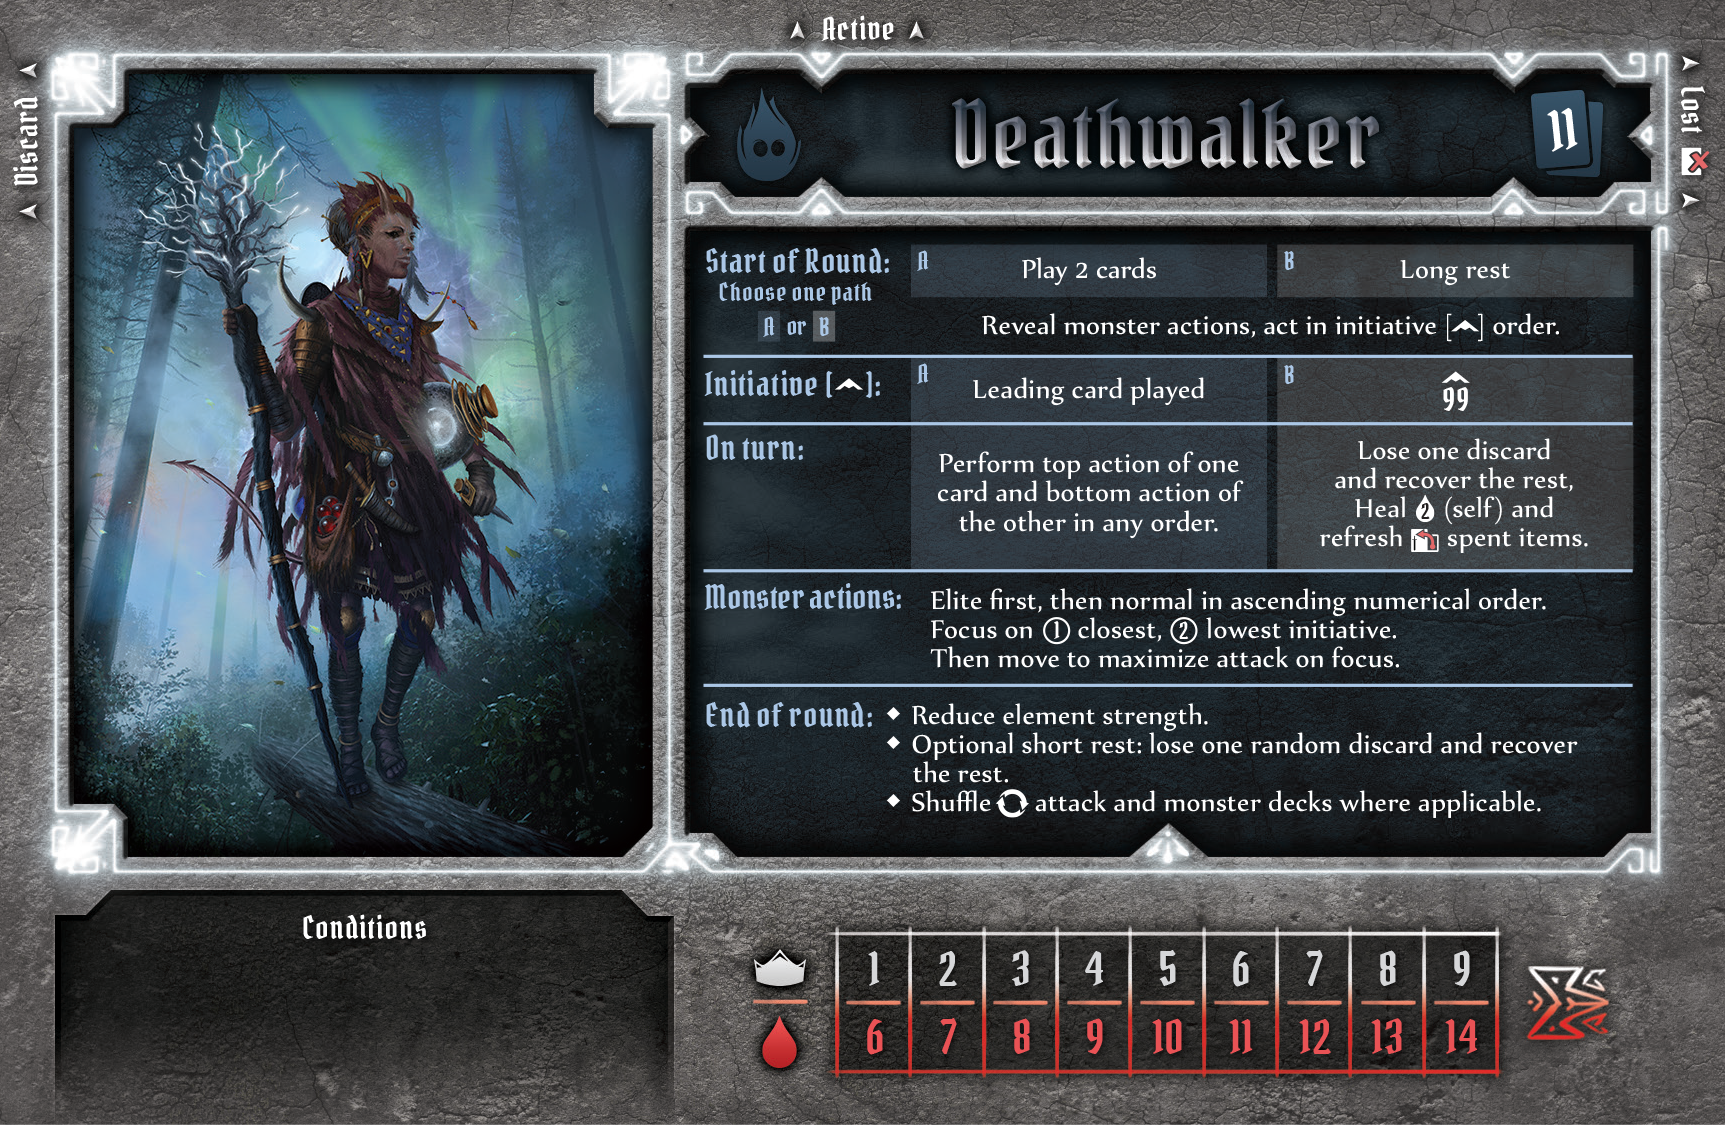
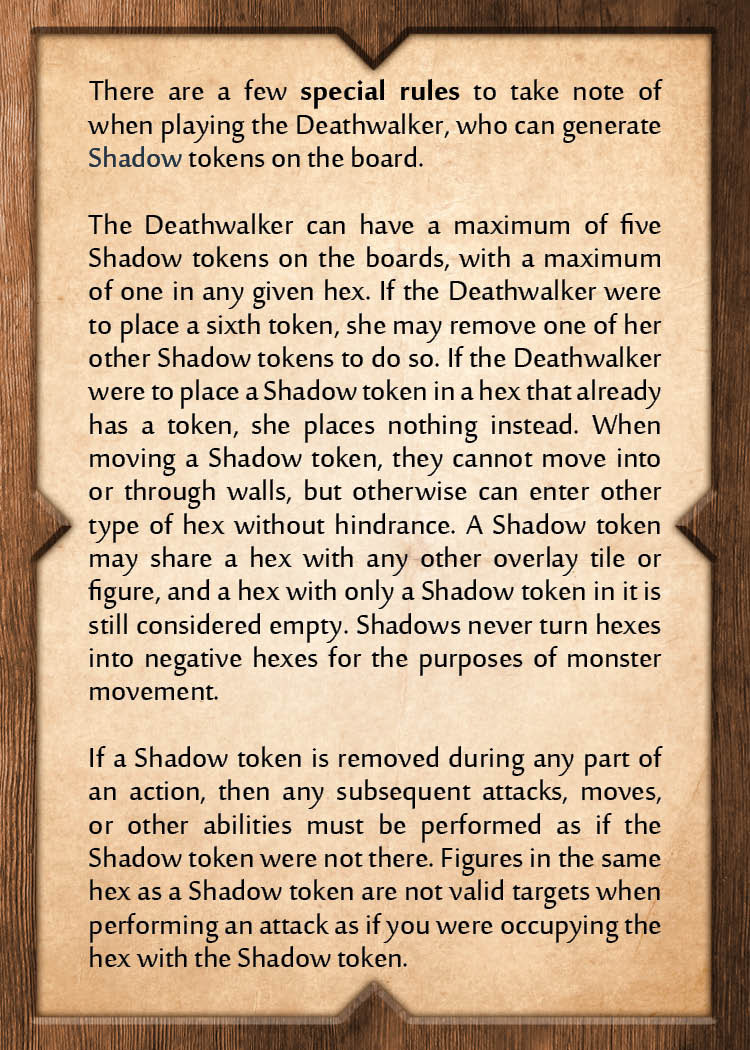 Like the Necromancer, the Deathwalker needs her teammates to buy her some time at the start of a scenario while she gets going. This class revolves around placing Shadow tokens on the board that can be used for a variety of abilities, such as boosting attacks, wounding enemies, increased movement, healing, and more. For those who have seen the Diviner class from the Forgotten Circles expansion, these Shadow tokens are like the Diviner’s rifts on steroids. Take a look at the special rules card for the Deathwalker, pictured on the right.
The more Shadow tokens you get on board, and the sooner you get them in play, the more options you’ll have for taking advantage of your strong card abilities. With limited movement, an 11-card hand and only 6 health, the Deathwalker’s mix of melee and range attacks will require her to bounce around the map with the help of her Shadows in order to be effective.
The potential for this class at higher levels seems incredibly powerful, as you can spread out your Shadow tokens and teleport all over the place, or damage enemies near Shadows without you even being anywhere near. The Deathwalker also creates and uses the Dark element.
CARDS
First, let’s look at the cards that can actually create Shadow tokens.
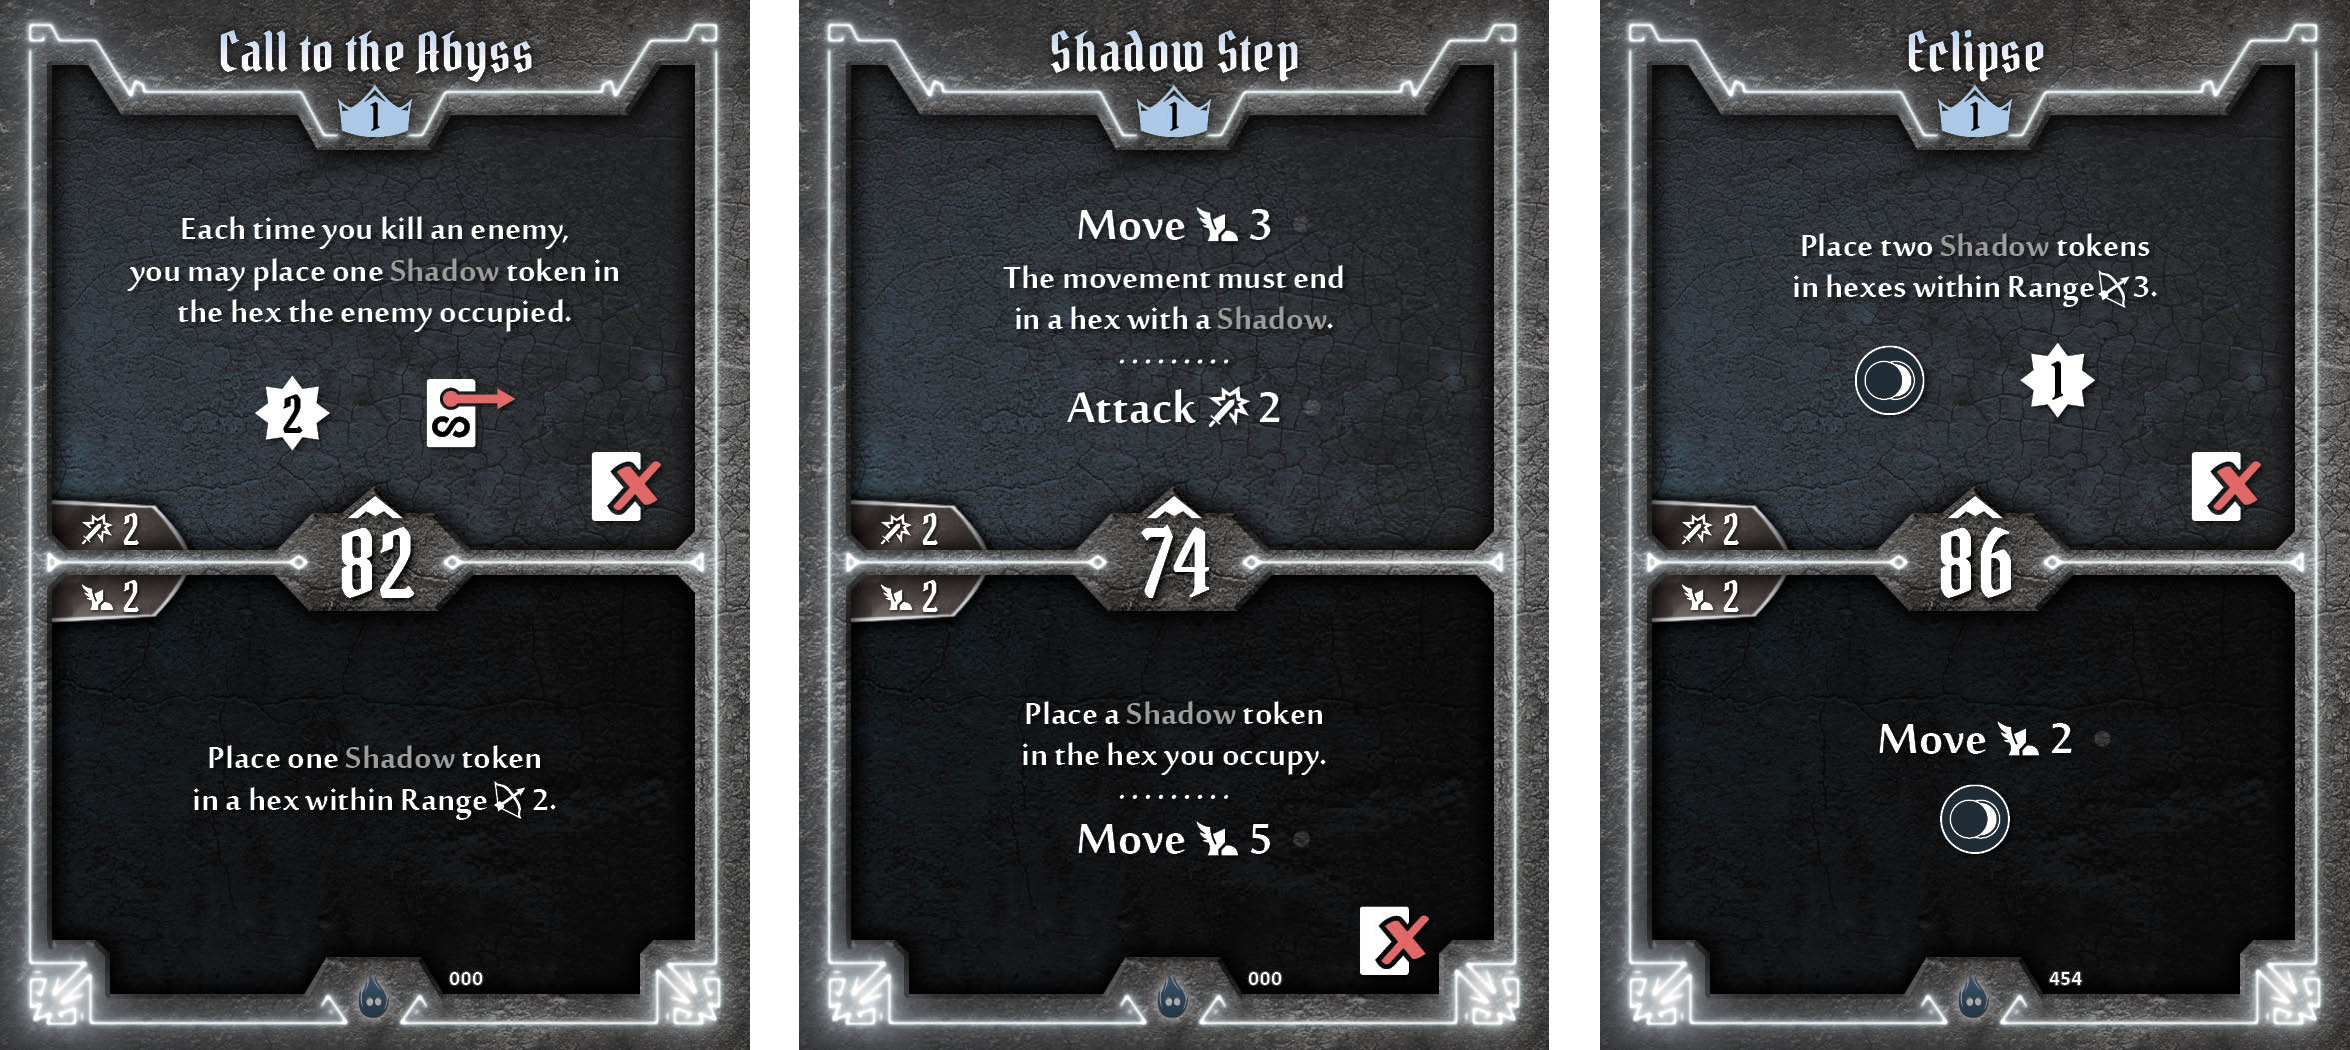
As you can see, there are only three of these cards at level 1. Call to the Abyss might be the Deathwalker’s most important card, as it’s her only reusable level 1 card that allows her to create a Shadow token. The other two cards that allow her to create tokens – Shadow Step and Eclipse – are both loss abilities. Expect to play Call to the Abyss in the first turn of most scenarios until you unlock more cards at higher levels. Considering the bottom abilities on some cards, the range of Eclipse could make for some interesting combos when played before another card.
Next, let’s look at the cards that have one non-Shadows ability and one Shadows ability involving moving or teleporting.
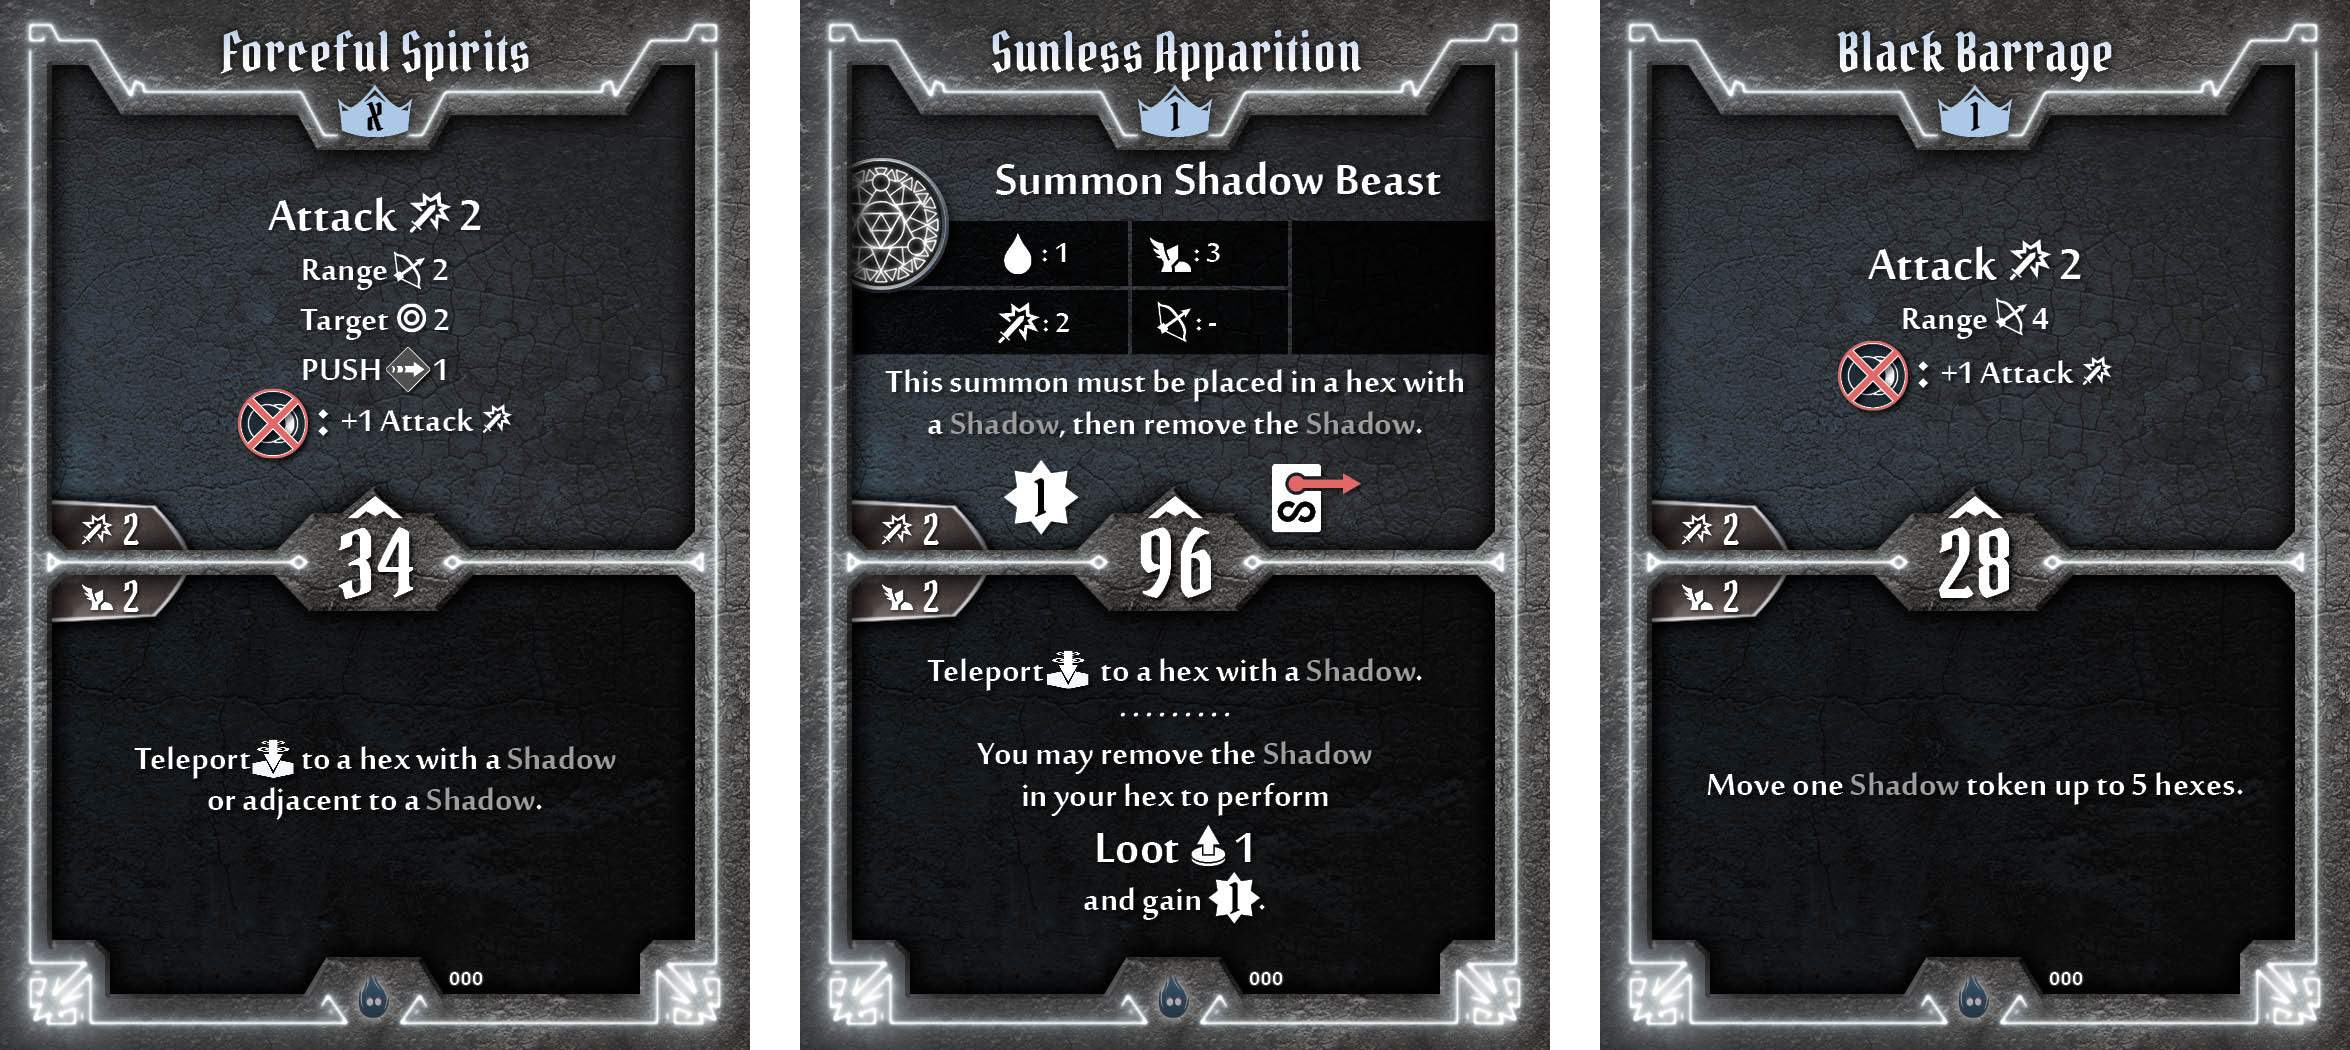
Notice all three of these are bottom actions, and none of them are losses. Any of these three cards could pair nicely with the aforementioned Eclipse.
Next, let’s look at the cards that either generate attacks or empower attacks in some way.
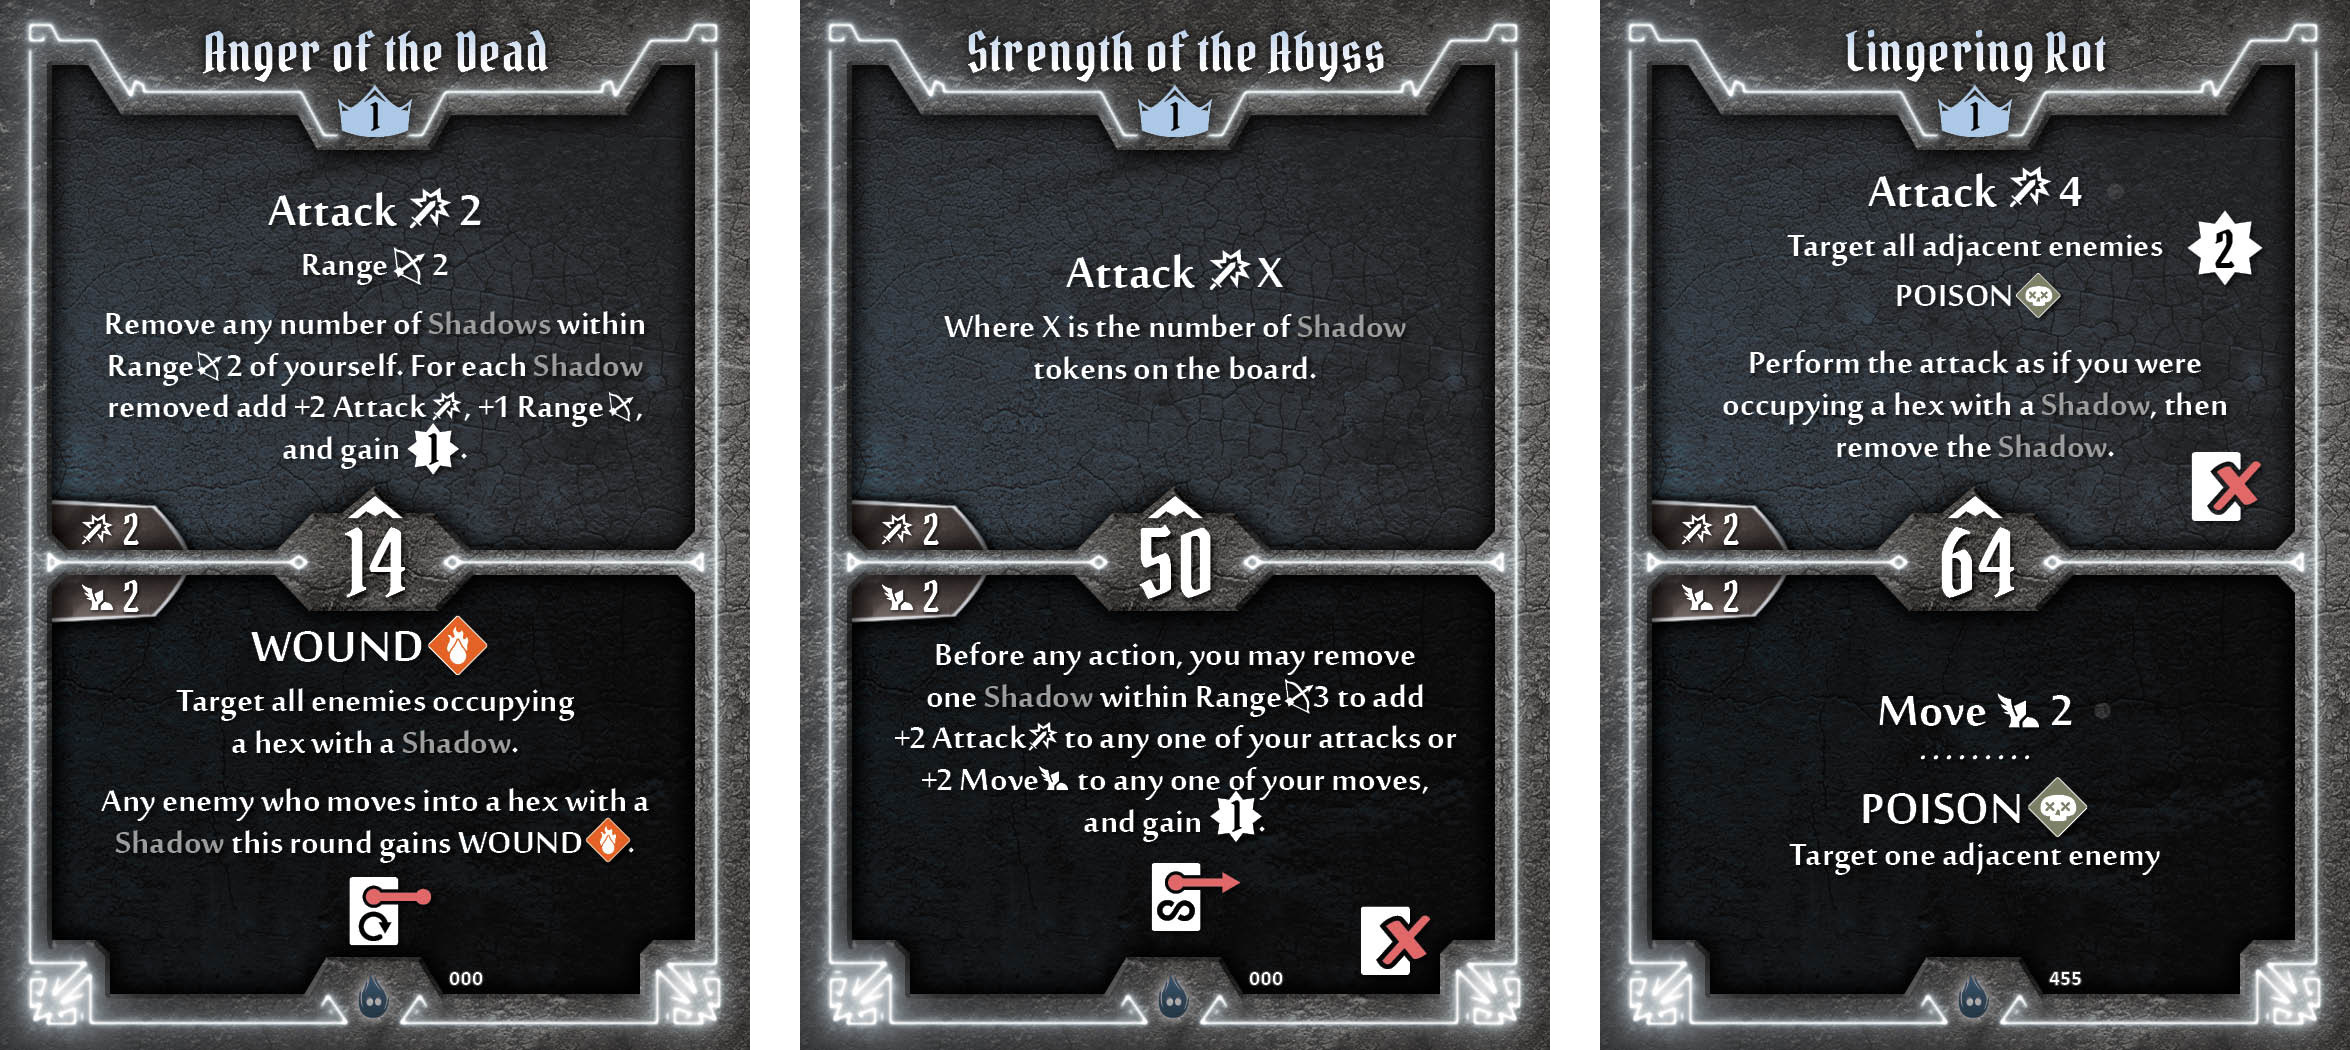
Between these three cards, you can increase your attack and range, wound enemies, poison enemies, and increase your movement. Some of these require removing a Shadow token. Anger of the Dead will likely see the most use, as it’s the Deathwalker’s lowest initiative card, and both abilities are reusable. Strength of the Abyss and Lingering Rot, while both strong, are more situational.
Now, let’s look at the rest of the cards that make use of Shadow tokens.

Rest in the Shade certainly stands out, as it’s the Deathwalker’s only Heal card. Since it’s reusable, can heal multiple allies, and creates Dark, this one will likely see a lot of use. Also, that bottom loss ability is just crazy, letting you move all your Shadow tokens up to 5 hexes. Restless Souls lets you move all your Shadow tokens as well, but only up to 2 hexes, which is why it isn’t a loss card.
Fluid Night seems like it’ll be another staple, with a strong reusable top attack that also generates Dark. If you’re in danger, activate the Round Bonus on the bottom to get you out of trouble. Wave of Anguish is quite similar to Lingering Rot, although that top loss ability allows you to attack with all of your Shadows at once. Positioning has never been more important.
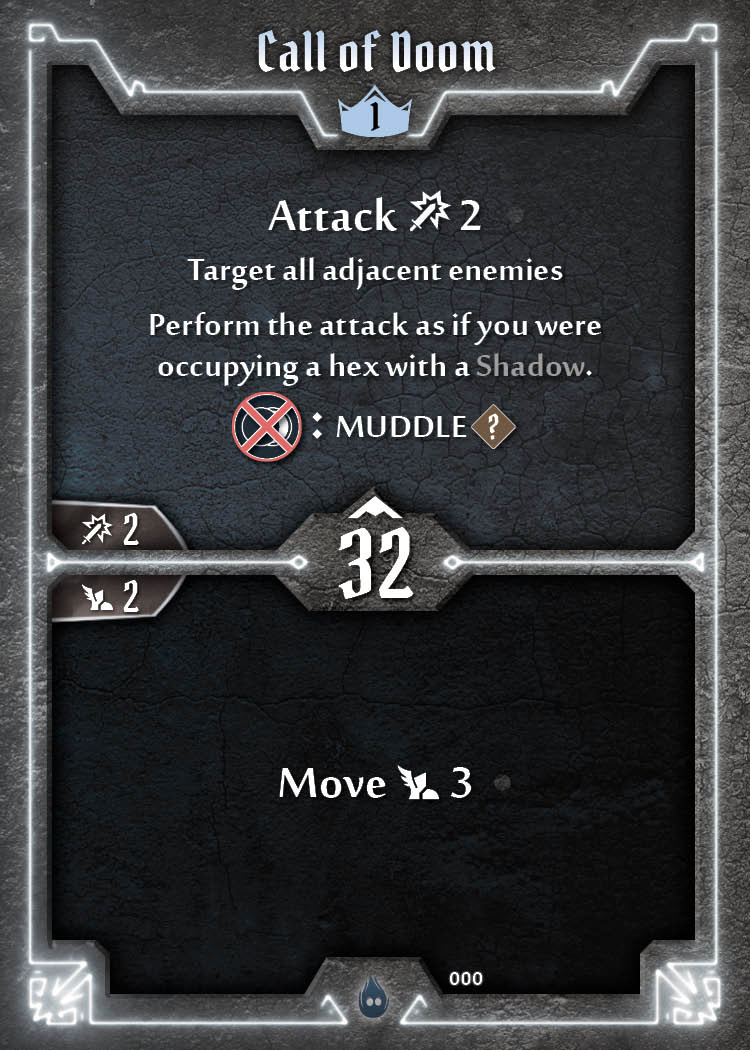
Call of Doom’s Move 3 is actually the Deathwalker’s biggest guaranteed non-loss movement card at level 1, so you’ll definitely get some use out of it.
PERKS
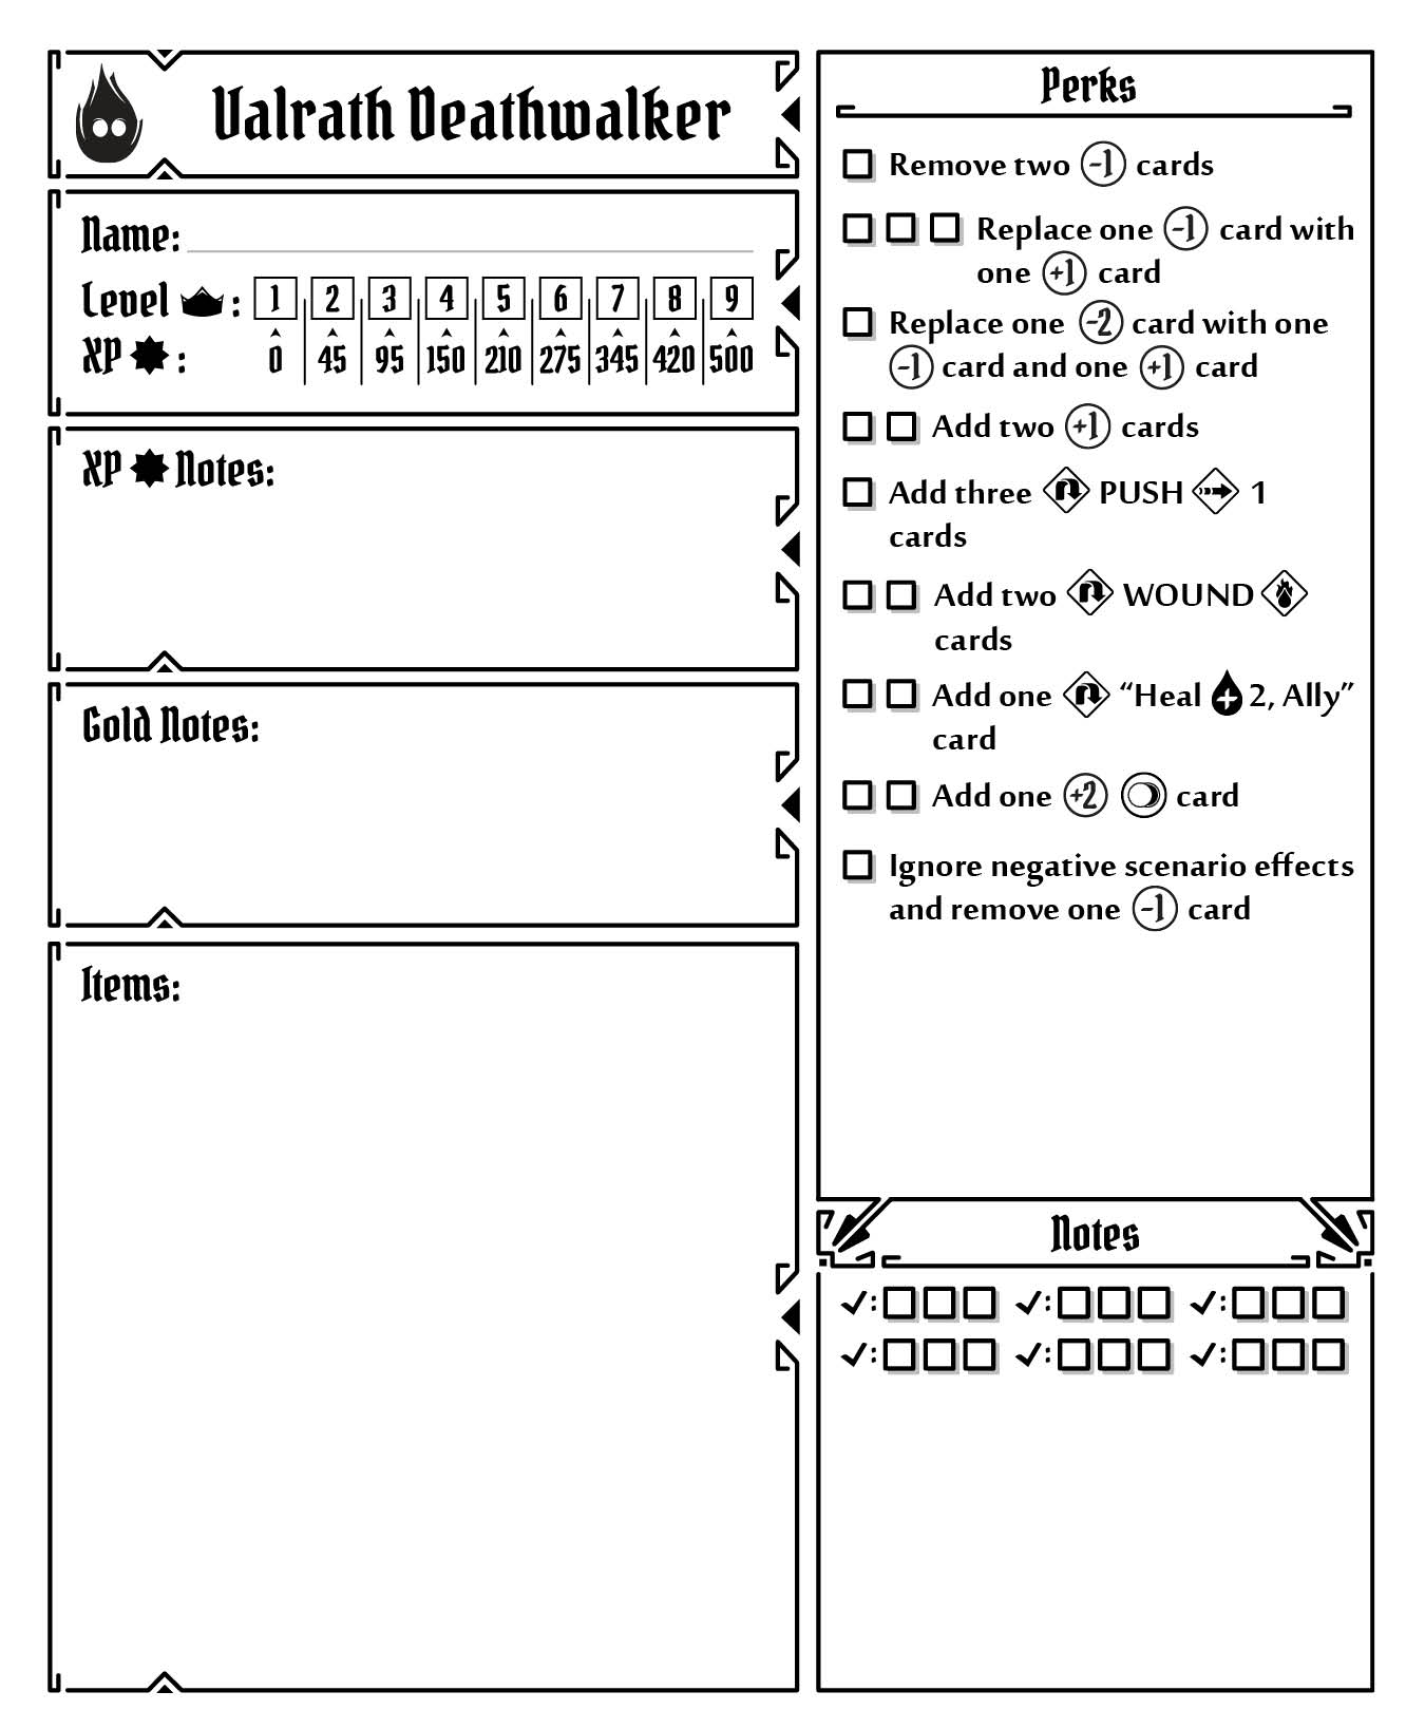
Aside from the usual optimization of removing negative cards and replacing them with attack boosts, ignoring negative scenario effects often comes in handy, especially for such a low health class, so that one’s probably worth prioritizing. Beyond that, I’d go for the rolling ally Heals since they don’t have any range restrictions, then I’d go for the rolling Wounds, and I’d leave the Push for last.
CHALLENGES
 The biggest challenge will be to remain effective while staying alive. You might not feel helpful to your party while getting your Shadows set up, but if you get involved too soon before setting up properly, you won’t be able to help your team. You’ll need to strike that balance of being patient but also not delaying too long.
Despite the Deathwalker’s many ranged attacks, her limited movement and reliance on Shadows can get her into some sticky situations. You’ll always need to plan ahead to avoid getting into trouble, as some abilities even require removing a Shadow from the board. You can’t afford to lose all your Shadows halfway in and then spend time building them back up, especially once you’ve discarded and lost many of your cards.
Overall, your success with the Deathwalker will hinge on your ability to manage your Shadow tokens and decide when to use the most powerful loss abilities. As long as your party has at least one good tank who can distract the enemies long enough for you to get going, you’ll be an absolute force. The biggest challenge might be convincing your friends to buy you some time.
You can build your network of Shadows slowly by not losing cards and playing more conservatively, or you can lose cards right off the bat to get more Shadows out there quicker. The choice is yours. Proper positioning and timing will be paramount to success.
Leave a reply
You must be logged in to post a comment.
